Not much of this is what you’d expect… unless you know me better
I wish I could say that everyone I’ve met or seen on the trail appeared perfectly competent and equipped for backcountry travel. Thankfully, none that I’ve come in contact with ended up on the evening news, or at least none that I know of. Yet I have seen people where I’ve had my doubts. So I want to talk about the things you can do to perhaps stack the deck in your favor should things not turn out the way you’d want.
First off, I want to briefly address the familiar concept, that there are ten essentials for backwoods adventurers. You know, the list that includes a first aid kit, map, warm clothes, snacks and water, and so on. I think those lists are rubbish. Heresy? Hear me out. It’s far too easy for people to go into places like REI, plop their wallet on the counter, and say the magic words: “help yourself.” These people might have just watched Alex Honold’s epic, felt a tug deep within their subconscious, and were moved to act. On the surface, this isn’t necessarily a bad thing. Anything that gets people off the sofa is at least basically good.
We see people who’ve got the shiniest, best gear that can be had for any price, trundling through the woods. They’re going to be safe, or so they think, because they have the ten essentials buried somewhere in their packs. But they lack the one thing that doesn’t appear on those lists. The one survival multitool that can’t be bought in any store, not for all of Smaug’s riches.
So I want to talk about that multitool: your smarts. Because with it, you’ll realize that the ten essentials are fungible, even expandable. Without smarts, the ten essentials amount to deadweight, even false hope and the fallacy that nothing can go wrong. Handing someone a scalpel doesn’t automatically make that person a surgeon. Giving a kid the keys to a hot rod yields predictable calamity.
In various posts, I’m going to discuss the basics of the list, though I’ll be leaving out obvious ones. (If you can’t figure out a floppy hat and sunscreen on your own…) Likewise, because that list should be fungible, I’ll be making additions as warranted. One thing I don’t like about that ten essentials list is that there are only ten essentials. Well, in the wintertime, at the very least, you need to add crampons or snowshoes, maybe an ice axe, perhaps even an avalanche beacon, probe, and shovel.
And so, before hubris gets the better of me, a bit of humility. I’m not perfect, nor will I present myself as the alpha and omega of all things in the outdoors. I base this essay on my own experience, both recreationally and professionally. I base it on my own research, classes I’ve taken, and so on. All of that is, of course, fallible. When in doubt, stay off the trail until you’ve resolved that doubt. And please, if you’ve got refinements or outright better ideas, post in the comments. None of us is as smart as all of us.
There’s an idea that we should have a survival kit somewhere, and if asked about mine, I’ll show you my pack — everything inside is there because it’ll keep me alive for at least one unexpected night in the woods. None of it would be worth all the tea in China without what’s kept under my hat. Carrying a knife can be a great thing. Knowing how to use it means you can have shelter, fire, and many other wonderful things. Not knowing how to use it means it’s deadweight at best, a bloody liability at worst. Similarly, there are people who have a hard enough time lighting a match, let alone getting a campfire going.
One of the first things on the basic ten essentials list is navigation — you should have a map and compass. But flipping through the Accidents section of Appalacia the other night, I noticed that at least one rescue was initiated because the victim’s map got taken from him by the four winds. Yikes! So to that, I leave the trailhead with a map of the local area in my pocket, yes, but also a “general purpose” map of the Whites in my pack as a backup. OK, that’s cool, but what if the backup falls prey to the same fate as the first map? And that’s where we talk about using our smarts.
Over the past couple years, I’ve done almost nothing more than staring at maps of the Whites. I’m not going to say I’ll be putting in for Larry Garland’s job anytime soon, but I’ve got a decent idea of the lay of the land. There are a few overall patterns. Generally, the ranges in the Whites trend mostly north-south. Usually, a range spans about 3-5 peaks, before being broken up by a notch. Admittedly, south of the Kanc, things get a little weird, so don’t be dogmatic. For most places, as long as you walk in the right direction, going downhill will get you to a road within a day’s walk. Almost anywhere, walking in the same direction will bring you to a trail within a few hours, geological barriers not withstanding. And if you’re still on a trail when you get disoriented, very few trails run for more than a couple miles before reaching a junction, trailhead, hut, body of water, or other landmark.
Besides that, there are signs, blazes, and cairns almost everywhere. Wilderness areas are the exception, and out there, I can only recommend that you be sure of your navigation skills before heading out. But in the more trafficked areas, and especially on the AT or just off it, there are conventions. The AT itself is usually heavily blazed, and those are the familiar 2 by 6 inch vertical white stripe. It’s hard to go more than about 100 yards in most areas without seeing one. If a trail branches off the AT, it’s a similar sized blue blaze. If it’s a trail that’s not associated with the AT, it’s usually a yellow blaze. Most trail signs that are near a road will have some indication of same. For example, if you’re on the Whitehouse trail near the bridge, there’s a sign which points out the Flume Visitor Center, and its mileage. (Someone can remind me, but as I recall, the sign at the junction of the Nineteen Mile Brook trail points out that it’s 1.9 miles to Route 16.)
So without a map, as long as you’re mobile, you’re not out of options. If you’ve done your homework before hitting the trail, you should have familiarized yourself with where you’re going, what trails you’ll be using, which ones you’ll be passing, what local roads serve the trailheads, and so on. This shouldn’t be like studying for a high school chemistry exam, but ideally, you should be reading the trail descriptions in the AMC guide (or whichever is relevant to your area — Green Mountains, Katahdin, Adirondacks, Yosemite, or beyond…) Steve Smith and Mike Dickerman’s book on the 4,000 footers is, in my opinion, the gold standard reference for those peaks.
You should also be doing a little research on the web, by gathering information on the expected weather, trail conditions, and even on the status of the fire roads and gates in the colder months. How does weather figure into navigation? You read in the forecast that clouds were expected later in the day from a storm that passed over Chicago yesterday. On the summit, you look all around, and while it’s clear on one side, there are clouds approaching from… oh wow, that’s west! (“Huh. It’s getting a bit cold and windy from that direction, too.” More on that in another post.) To put this in perspective, I generally budget an hour or two every week to bone up on where I’m going, and a little extra for a backup plan.
So, to play with that basic idea, you’re somewhere between North and South Kinsman, and you lost your bearings. On a sunny day, if you walk along the ridge with the sun at your back, within an hour, you’ll be at the overlook. Ahead of you, there’s a mountain with a tower on top — any skier knows that’s Cannon. OK, off the top, your choices are to head west onto Mt Kinsman Trail, and in around 3-4 hours, you’ll be at the trailhead on route 116 in Easton. Alternately, go east and stay on Kinsman Ridge trail, follow the white AT blazes, and you’ll be at the Lonesome Lake hut in about 3-4 hours. (Pro Tip: the AMC staffs the hut just about year round.) From there, it’s a short downhill to the parking lot.
Maybe something went really weird, and you’re off trail. Your research told you that the Kinsmans are neatly bounded on the east and west by 93 and route 116. You make your way downhill, and though it was a tiring bushwhack, now you’re at a road.
All that without a map.
Be reminded, though, that smarts is required to play this game. You drove up 93, through the Notch to the Kinsman Ridge trail. You want to hike up to the summit, and descend by Hi-Cannon trail. In the notch, you noted the location of the Lonesome Lake campground, and you know that the Pemi trail is going to get you back to your car at the trailhead. You also gazed in awe at the huge, sheer cliffs on the east side of Cannon… not all that far from the Hi-Cannon trail. Is that the place to go bushwhacking? I can think of a lot better places.
Now, let’s turn to the map. A map, carried to a summit and examined carefully, can be very useful to anyone even barely able to read it. If you’ve got a compass with which to orient the map, it’s even more useful. But if, for example, you’re on the fire tower atop Carrigain, and it’s one of those days where the view is limited only by the curve of the earth, you can identify Washington by its towers, and so you sight a line between the dot on the map that marks Carrigain, and the dot that marks Washington, and now your map is oriented. From there, it should be easy to look around, and identify some of the other peaks.
Or maybe you’re on Bondcliff. You see this gigantic, long lump across a valley. To your left is the sun. It’s midafternoon, so you realize you’re looking west (the sun crosses the southern horizon, in case you forgot!) On the map, you see a vee, descending sharply from the north, and it’s got Hellgate Brook running down its middle. To your right, you notice a steep and deep ravine that comes down from the north. Oh hey, that lump to the west must be Owl’s Head, and behind it must be Franconia Ridge!
You’re on Eisenhower, to the north are clouds, and you can’t see Washington. You’ve got no idea what are the other peaks that you can see. But you’ve got your compass. In the corner of the map is a very prominent arrow which points out which way is north on the map. For most maps, north is also the top edge of the page. If you’re new to compasses, disregard the declination adjustment for now — it’s no more than about 15 degrees, and for most purposes, that’s not enough of an error to matter. Just put your compass on the map next to the map’s arrow, turn map until the needle lines up with it, and you’re set. Yes, this means that if you’re looking to points south of you, you’re going to hold the map upside down.
A note about compasses. There are compasses, and there are “compasses” that are really just a talisman at best. I’ve seen, bought (as part of a kit) and been gifted numerous of the latter. Generally speaking, if it’s the tiny thing that’s part of an inexpensive “survival kit”, or it’s attached to a whistle, on a keychain, or something of that sort, you have my permission to go ahead and make art out of it, throw it in the garbage, use it as a Monopoly piece, or whatever. You do not, however, have my permission to bet your life on its accuracy. Instead, buy a real one. Expect to pay around twenty bucks or so for an inexpensive model, twice that if you’re going to splurge. (But splurging won’t realistically get you any better performance, nor any greater usability.) Brunton, Silva, and Suunto are good brands, and have never let me down. I keep at least one in my pack at all times.
So now you’ve got your map oriented, and you realize you’re facing west. You can see a sliver of Mt Tom to the southwest, and to the west, Mt Hale. You also know that going down from the summit to the north, you’ll be able to catch Edmand’s Path just beyond, and in a couple hours, maybe even get some coffee at the Highland Center before heading home.
Another brief note about compasses. Every so often on the trail, you’ll find you have the need to go off-trail for a moment to answer the call of nature. A strategy will get you back where you started in short order.
First, if that compass is in your pack, take it out and hang it from your neck by its lanyard. (If it didn’t come with one, some paracord or something will do to correct this deficiency.) You can grab your trowel and TP from your pack and leave your pack by the trail, so others have a sense of where you are, but beware, bears have been known to notice wayward packs and all their tasty treats inside. And if you get lost, all your gear is at the side of the trail, where you are not. In any case, as you’re walking the requisite 200 paces, watch your compass heading, trying to hew to it as best as terrain allows. (Try to avoid complicated twists and turns.) On the return, walk the opposite heading. For a more detailed explanation of how to do this, I wrote a short snippet here.
But… what if my compass gets lost or smashed? All’s not lost. Look to the contour lines. Lines bunched up indicate sheer faces — look at Bondcliff, the west side of Mt Webster, or the east side of Mt Willey. A vee with a blue line down the middle indicates a ravine — look to Walker Brook on Mt Lincoln, or Ammonoosuc Ravine on Mt Washington. Lines that are more spaced out indicate easier slopes. On Moosilauke, Beaver Brook trail is very steep, and so its contour lines are close together. But on the other side, Glencliff trailis much easier, and so its contour lines are spaced wider. Practice spotting this, to get a sense of how the map translates real life. Up on Wildcat D, looking over at the old rockpile? Haul out that map, and find where Tuckerman’s Ravine is, Raymond Cataract, and so on. On Garfield? You’ve got a great view of Owl’s Head, but also the slide of Franconia Ridge, and you can see Liberty and Flume in the distance. Maybe you’re partway up Carter Dome trail, and come across a bunch of switchbacks — they’re visible on the map! Now you can apply that to those circumstances where you need to orient your map by where you think you are, and what topography you can see all around you.
I want to touch a little on trails. Significantly, most of the Whites were outright ransacked by lumber barons in the late 1800s through to the early-mid-1900s. (The last of the lumber railways ceased just around WWII.) This involved the rail beds we now know as the Lincoln Woods, Zealand, and Ethan Pond trails, among others. But besides that, there were numerous spur lines, truck roads, and so on, many of which made the footpaths we walk on. The Appalachian Trail is heavily travelled and very well maintained. In short, most trails in the Whites have a certain “set” to them, and after awhile, a White Mountains trail becomes familiar for how it appears. So while you’re navigating on otherwise familiar paths, it’s worth looking around and making a mental inventory. Obvious giveaways are blazes and cairns, of course, and if you get lost on the massive amount of bog bridges on Lend-A-Hand or the back side of Lonesome Lake, I’ve got nothing for you. But during easier excursions, become familiar with how a trail should look. Knowing what normal looks like makes it much easier to know when things took a turn towards abnormal.
Similarly, trees can help where elevation is concerned. Tree line is around 4,200 feet in most areas, but check your guidebooks — some mountains are still recovering from devastating fires suffered during the logging era. Spruce will come to this point, changing rapidly into the gnarled, stunted krumholtz that hardly rises above the waist and that extends into the alpine zone before it too peters out. Conifers will descend to around 3,000 feet or so, mixing with the deciduous species found at lower elevations down to around 2,500 feet. The AMC guide often (but not always!) remarks on the changing of trees as one rises in elevation. Paying attention to this can help you approximate your location on a map. Also, if you have a copy of the Randolph Mountain Club’s fine map (covers the Randolph Valley, Waumbek/Starr-King, and the northern Presidentials from about mid-way up the Great Gulf) you’ll note it shows the regions covered by deciduous, mixed, and conifer forests. It’s an excellent resource.
Lastly, a few thoughts on celestial navigation. Most people think of navigating by the stars, and yep, that’s exactly that. But don’t forget, our Earth orbits a celestial object. We know the sun rises in the east and sets in the west. It’s not exact, because as the seasons change, the exact points move. But it’s a good baseline. At noontime, the sun is high in the south. Usually, if you keep that as a rough estimate between, say, 10 in the morning and 2 in the afternoon, it’s probably good enough if you’ve got a good sense of where things are to start with.
At night? Wow, that’s harder for most people, myself included. Throughout New England, if you’ve got a clear view up, you should be able to see Cygnus, Cassiopeia, and the little dipper — they’re visible year ‘round. In the wintertime, Orion crosses the southern sky. My bugaboo is that skies in the Whites have way more stars than I’m used to, and I spend time trying to “toss out the extras” so I can figure out where are the ones I recognize. A good star chart can be handy if you’re adept with one; from personal experience, it was about a summer’s worth of looking around to get comfortable with finding things in the sky that I could see in a chart, and then it’s just looking up at night for a few minutes every so often to stay good at it. There’s a reliable way to draw a mental line up from the edge of the cup in the big dipper, and intersect that line with the North Star; I recommend looking to the web for more on that one. (But keep looking up anyway, because those stars are beautiful.) Sites like EarthSky, Space.com, and Sky and Telescope have information on what stars, planets, and constellations are visible month-to-month or more frequently than that. I also recommend visiting your local planetarium and taking in their shows on astronomy. In a pinch, this might save the day, but remember, just as the sun moves across the sky hour by hour, so to do the stars. Finding where you are by objects in the sky requires a firm grasp on where you are in the day.
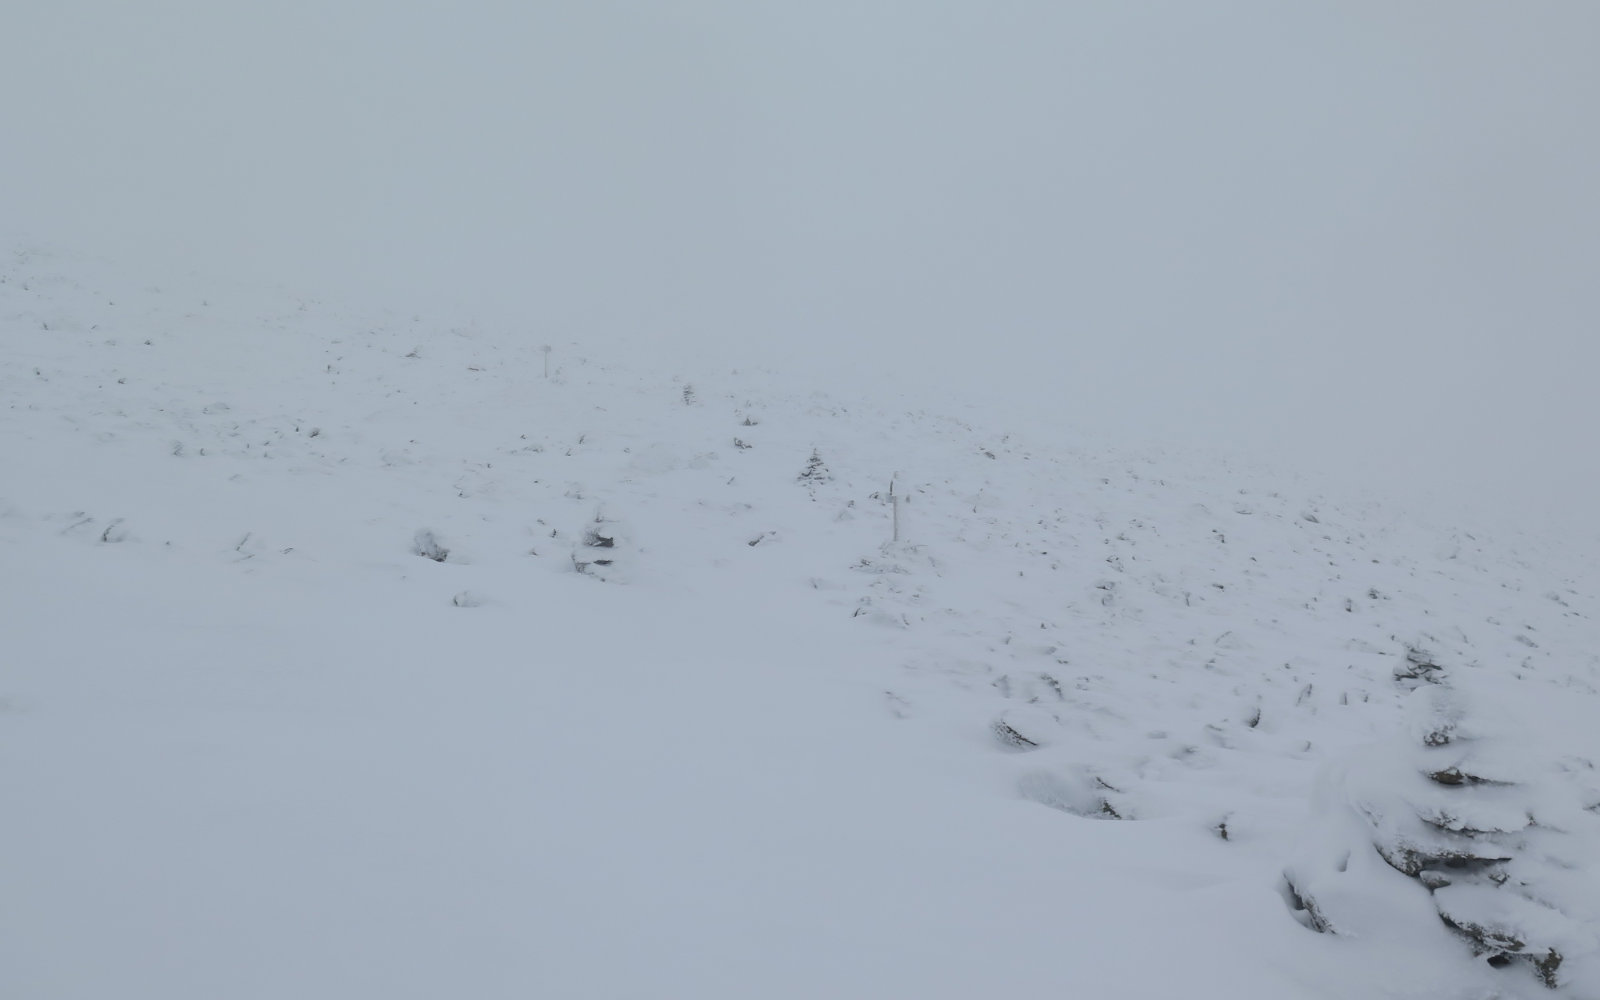
Wait… I brought up celestial navigation, but I didn’t mention GPS? What about those “celestial objects?” The plain truth is that batteries die. Modern navigation apps have made tramping around in the woods almost mindless. But in my opinion, that’s their achilles heel — they can be mindless. If you’re descending Crawford Path in whiteout conditions, and your GPS dies, what’s the backup plan? Some of those cairns are quite a distance apart, some of them are pretty low to the ground and can get covered by snow, and sometimes, it’s just plain hard seeing them against the background clutter. Give me enough bananas, and I’ll teach any monkey to use a GPS. Learning how to do things by paper map and compass engages those parts of the brain that leave you more resilient, more able to cope if things aren’t going perfectly. Much more so than any electronic gadget. Do I use one myself? Of course, and anyone would be a fool not to. But I always have my paper maps and a compass, just in case.
OK, so now what? Off the top, if you’ve never really used a map and compass, I emphatically don’t recommend that you get yourself lost and treat that as lesson one. Instead, take a class. Contact your local outfitter if you need help finding one. Barring that, at least get a map of an area you’re familiar with, ideally with long sightlines. Go up something familiar with a good view. From the top, haul out your map, orient it with your compass, and start identifying landmarks. There’s a great viewpoint on the Twinway where you can look down on Ethan Pond trail. From Monadnock, you can see Pack Monadnock, Sunapee, Watatic, and Wachusett. Made your way up Carrigain? Wow, the list of 4,000 footers you can see from there is pretty comprehensive, and the list of mountains in general even more so. Navigation is a perishable skill. Practice so those skills are there when you need them. I’m going to throw this out there: the hardcore trampers among us could potentially stand on any summit with a view, gaze outward, and identify summits. And from there, draw out compass points in the dirt. To me, that’s a pretty neat trick to learn.
This was a longer than normal post. I hope it’s been informative for people; I also hope you never get so lost that you need more than what I’ve said about blazes and following the trail. Get informed, take a class, and do your research before you leave the house. Don’t let mine be the last words you know on the subject. Again, if you’ve some pearl of wisdom to contribute to the discussion, please post a comment.
Postscript: More than once while writing this post, I thought about Geraldine “Inchworm” Largay — the AT hiker who got lost in the 100 mile wilderness and perished. But I also thought of the AT hikers whom I’ve met on the trail who got spun around. One guy, I met at Lincoln Woods after he’d hiked across the Pemigewasset wilderness — about a dozen trail miles off course. These are folks who had hundreds of miles under their boots. You’d think they were the most immune to getting lost, but it shows that it happens to the best of us.
As always, be careful out there.
If you enjoy reading these posts, please subscribe — stay in the loop! Your email will only be used to alert you of new posts — typically 1-2 times per week. I will not use or share your email for any other purpose without your express permission.


6 thoughts on “The Ten Essential Things You Need to Stay Safe While Hiking: Navigation”
Thank you for writing this; it’s really useful.
A small correction: to find Polaris, sight up the two stars at the far end of the *Big* Dipper’s cup. Polaris is the end of the Little Dipper’s handle.
Oh wow. Can you tell I wrote that at five this morning?! Thanks for catching that. I also added links to a couple sites where you can find “the sky tonight” -type articles. I think you’ll find them entertaining.
Blessing in disguise that you are home recovering. This is great! You’ve probably saved some folks a lot of aggravation and heartache with this. Looking forward to more!
Glad you enjoyed it. Just wish it was alongside yet another trip report. 😀