
It dawned on me that I haven’t really talked much about my photography. I’d been going through some hefty writer’s block this week, and to be true, it was really driving me insane. But then, the insight, and now, the writing.
I dearly hope that some of my photographs have inspired a few of you. No kidding, it’s a great joy to hear those comments, and I hope you’re sharing all this with your friends, so they too might be inspired to do great things, even if it’s not in the mountains.
Anyway, the big question: how do I create my images? Are there fancy cameras involved? A lot of editing in Photoshop? Black magic? Nope, nope, nope. None of the above. I do a small amount of editing to my photos, but it’s generally limited to cropping, adjusting contrast, and maybe fixing color — I use a very light touch with my adjustments. Mostly, they’re the image that my camera recorded. Like my hiking, any of you can do it with just a bit of applying yourself. Here’s how…
First, a bit of background. I’ve been taking pictures for more than four decades — I was five years old the first time I took a picture. (I still have that photo, too!) Besides that, I went to art school, and later, taught photography and design. And I have images that have been published outside this blog. But what do I have in common with everyone else who’s ever lived? I started somewhere. Along the way, I made tons of mistakes, and stacks of bad images that thankfully, have long since been relegated to the scrap heap. I can only imagine Einstein, Beethoven, Shakespeare, and others had similar piles of ideas that were never going to pan out. Like a turtle, you never get anywhere unless you stick your neck out. As the saying goes, you get to Carnegie Hall by way of hard work. I won’t mince words on that.
My camera set up is pretty basic — just a “prosumer” point and shoot. At some point, I’ll upgrade to a newer model of something, because after a couple years of being “lovingly” abused on the trail, it’s starting to get a little flaky here and there. But the camera doesn’t matter. To underscore that, I’ve used cameras across the spectrum from absurdly cheap to absurdly expensive. Although I’ve taken great pictures with all of them, none of them has prevented me from taking a bad picture.
Oddly, regardless of which camera I use, the ratio of mistakes to moneymakers is about the same. Generally, I toss a dozen or so images for every one I keep. This has been the same ever since art school: as I’ve gotten better, my demands on myself have also increased. So if you judge how good you’re getting by how often you’re getting “the shot”, remember that you’re chasing a brass ring.
But also, keep in mind that it doesn’t take special hardware to shoot the most compelling images. Some of the most famous images in the world were shot on common 35mm film, with the same cameras that anyone could buy off the shelf. Even the images from the moonshot were taken using a fairly standard medium format camera, albeit with modifications to allow the astronauts to use them with their bulky gloves. It’s what’s between the ears, not what’s in the hands.
When I’m hiking, I’m always looking around. It’s good to look, because you get to see beauty, right? Right! So I’m looking, and I see some lyrically beautiful painted trilliums on the side of the trail. Before I raise the camera, I have a harder look. I might crouch down, step to one side or another… basically, I’m evaluating the scene. And there’s no magic. Look for what you want to see in the final image. Balance how the light is splashing across the leaves, how the shadow might make some petals fall back, while a highlight might push others forward. You can’t take a photo of something you can’t see, so take some time to look and see.
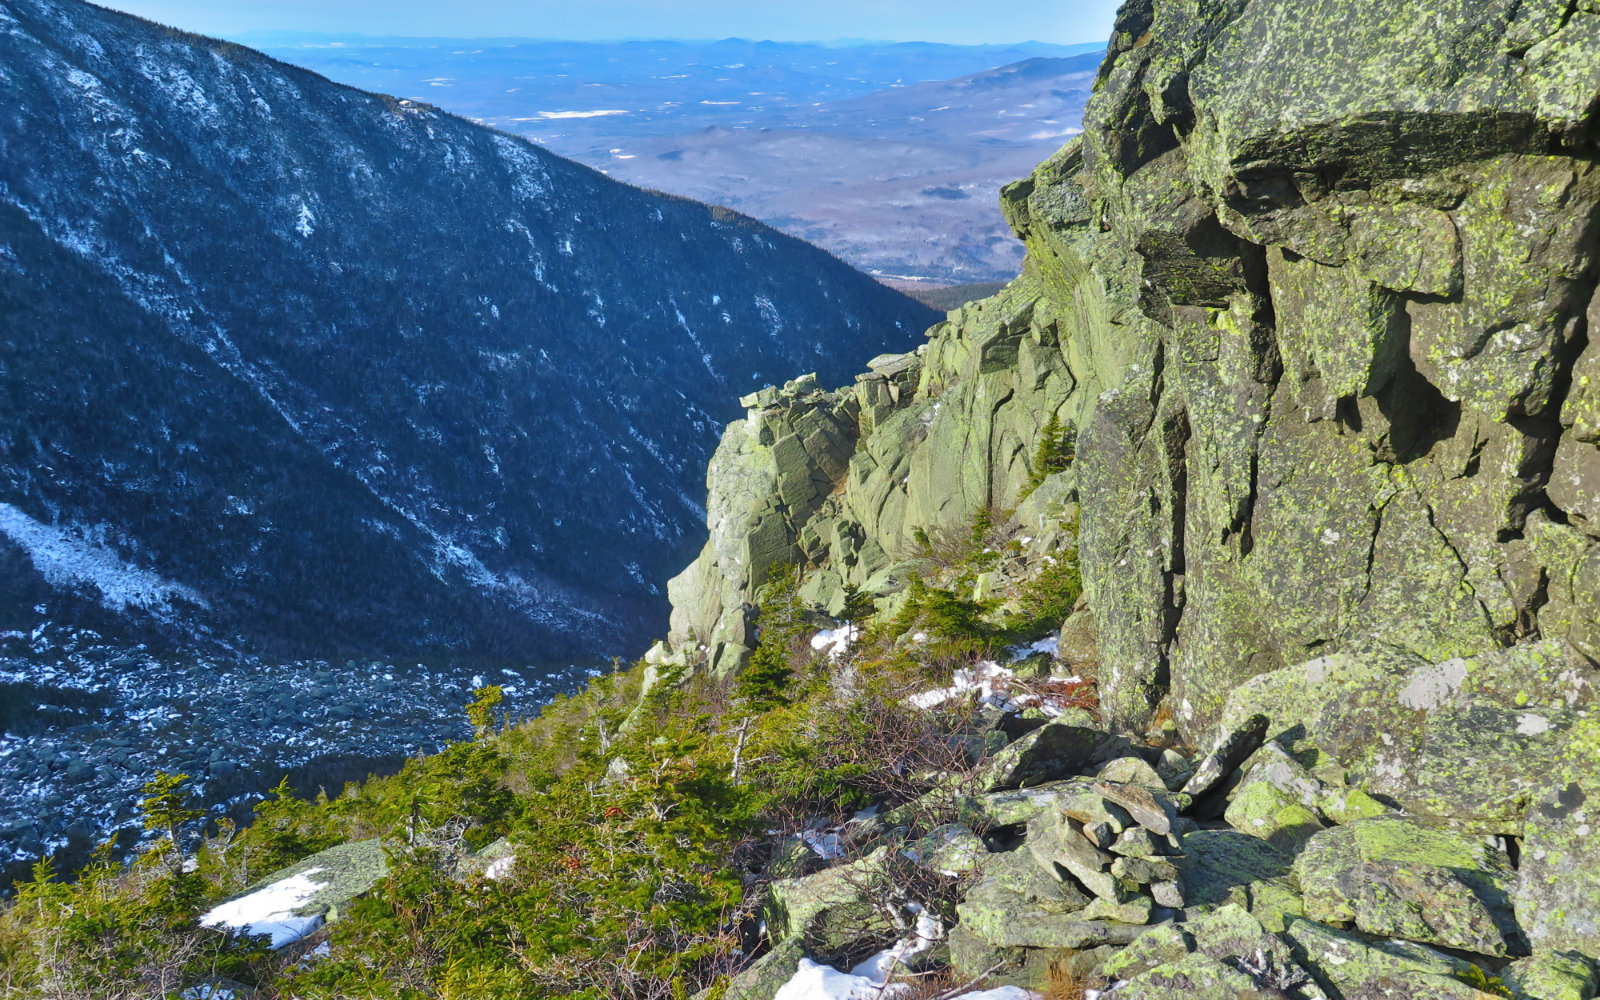
Sometimes I look at something I really want to photograph — something I really want you, my readers, to see. And yet, it’s not going to work out. The classic example is looking onto Washington from Adams. Facing south, as one can only do, the old rock pile is always going to be in shadow from that vantage, and so detail of the mountain but for its silhouette will be lost. I got really lucky with that shot, because the clouds were reflecting some light onto the northern side of the mountain (and the snow over there helped, too.) But especially in summer, without that snow, that shot is going to be a lot darker. Looking over to Madison, you can see shadow on the left side of the summit cone, with the sun highlighting the right side. Over on the top of Chemin des Dames, you can see the rocks nearest me are in full detail, whereas the far side of King Ravine is a muddy shadow.
Sometimes with things like flowers, I can move around so the sun shines to my advantage on my subject, but sometimes, there’s nothing for it but to “take a picture” with my mind’s eye, and content myself with that. Over time, you’ll start to notice certain flowers follow the sun, so you could plan trips to position yourself advantageously as you pass by if you were so motivated.
So now I have an idea of what I want to make an image of, and some measure of how I want to compose that shot. But the reality of vision is that the mind can sometimes create the ideal image in our heads, even though it may be at odds with what the camera actually sees. So it’s time to raise the camera to my eye and get a better sense of what the final image will look like. And sometimes I’m dismayed. Occasionally I’m delighted. And, as sometimes happens, especially in winter when I perpetually feel like I’m short on time, I take the shot and hope.
How to compose that shot? It’s tricky, and to those into the finer points, I have to suggest going to art museums and staring at tons of paintings over and over again. And it wouldn’t hurt to devour books on photographers as well. But a good short cut for a basic shot would be to use the rule of thirds. Most digital cameras have a mode where you can put an overlay on top of your preview image that divides the screen into 9 blocks. Put your foreground subject at the intersection of one, and a background subject at the intersection of another. Usually this works out well enough. But while it’s called a rule, it’s not hard and fast. Sometimes, it’s a guideline.
So with that in mind, let’s examine how that works in a couple of my images that I took on Katahdin last summer. I call this first one “sentinel rock”, because I remember, during both my hikes up there, feeling like it was sort of standing there, keeping watch over the trail. Anyway…

I’ve laid some rules across the image, each is 1/3 the distance from its nearest side. This is what we talk about with the rule of thirds. Now, usually, you’ll take, say, the upper right and left intersections, put your friend’s face on one, and a distant mountain on the other, and there’s a fine shot. (Don’t forget to get a little sunlight on your friend’s face!)
In this image, I’ve used it a little differently. I put the sky very firmly in the top third, and the ground very firmly in the bottom third. The horizon and the bit of the plateau before it drops off — so the sort of “interstitial ground” — is in the middle third. Then you’ve got the large rock on the right-most vertical, and on the left, the trail disappearing in the near-distance. I’ve not quite totally ignored the intersections, but I’m not hewing closely to them, either.
This image works for me on a few different levels. First, I got profoundly lucky with the weather. There are clouds in the sky. It’s not 100% clear, nor is it 100% overcast. Instead, there is enough of a balance between the two, making the sky interesting to look at. The clouds catch your eye, and starting from the foreground, they diminish in size as they approach the horizon, lending a sense of depth to the scene. There’s a balance between the vivid green in the foreground, to the blues that lighten as you go off into the distance — again, it creates a sense of depth. The sun was in just the right spot, too. The balance between sun and shadow made for good definition of the shape of the rocks. Everything is 3-D, nothing is flat.
By the way, here’s that same rock from the previous year’s trip, but in black and white.
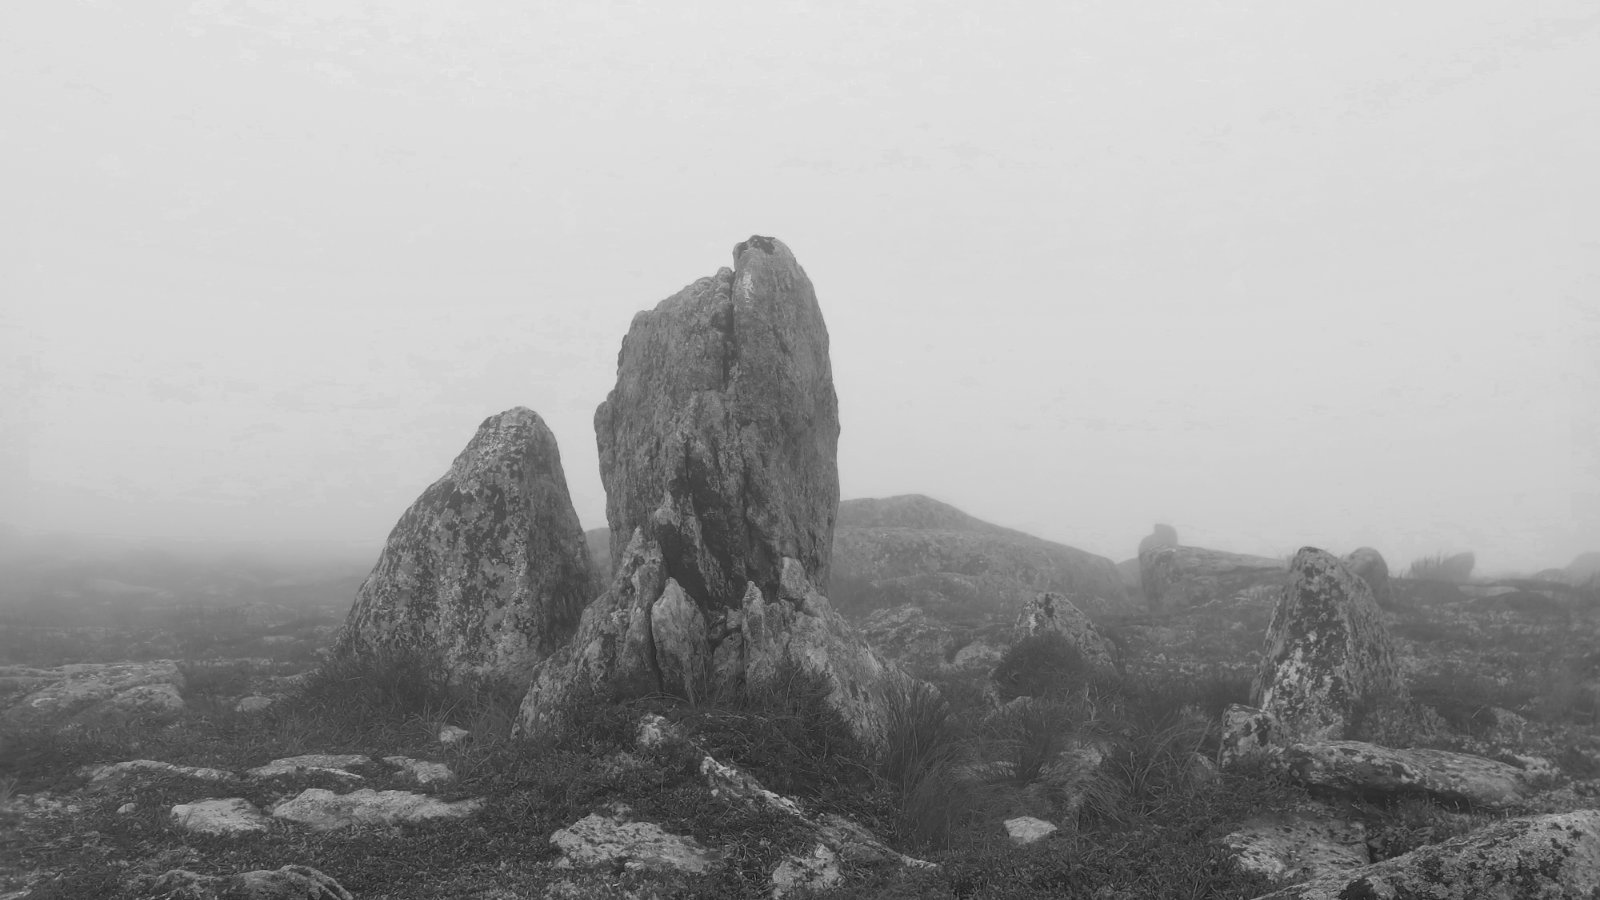
A very different image, and you can see how the lack of clear sunshine flattens the image — there are no shadows to lend definition. With the lack of those fluffy clouds in the sky, or the mountains in the background, the sense of depth is profoundly diminished. The mood of the image is also drastically altered. Those rocks have nothing else around as their companions. Now, it’s a strong sense of loneliness, where in the other image, there are all sorts of other elements hanging around. The lack of color in the image was a conscious choice, and it further enhances the sense of loneliness.
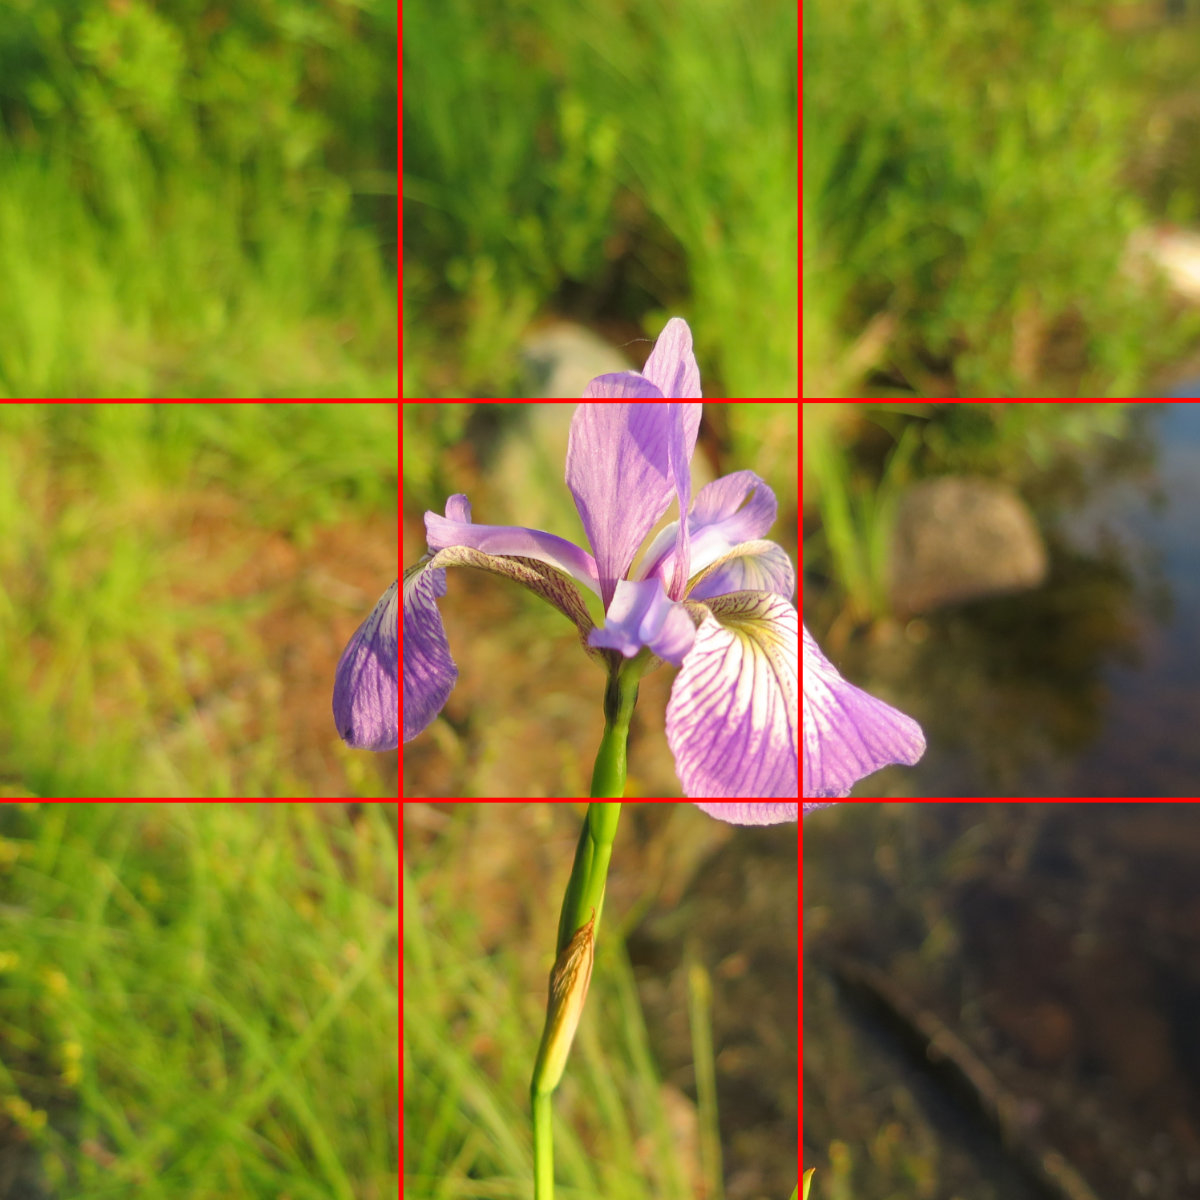
Moving on, now let’s look at this photo of an iris (iris prismatica) that I took on that same trip to Baxter, last summer. It was growing by the side of Grassy Pond, not far from the AT. By a strict interpretation of the rule of thirds, I put this one wrong: it’s dead center. And yet, it’s a powerful image. The flower, on its own, distilled to its sole element. It’s in sharp focus, the background is very blurred. You can see enough of the background, though, to give it a sense of place. But the object you’re looking at is the flower, nothing else. It’s also a squared-off composition, which speaks to the proportions of the flower itself — a rectangular composition would have left too much space on the sides. By squaring it off, I limit the focus to the iris. It’s got enough breathing room, but not too much, not too little. Here, I’m using the thirds to create the frame.
OK, so that’s a couple of examples for you to ponder.
I want to touch a bit on editing next. In short, I don’t do much. You should aim to as well. While it’s true that with modern tools like Photoshop, you can do almost anything to an image, at the same time, I believe in “garbage in, garbage out.” In other words, if you take the shot correctly, in the camera, you’re not going to have to edit much. Maybe a slight tweak to the contrast, perhaps the green needs to be dialed back a little. Occasionally, I might touch up a color or two, to make the image a little more punchy if it’s a little washed out. But I don’t do any heavy lifting, because that stuff takes a lot of time that I don’t have, and frankly, I’d rather do it right, first time. Taking the correct image in the first place takes only a few extra moments. So try to slow down a little, and get it right at the outset.
Putting things over to you, I recommend these things, first and foremost:
First, stop and look. There’s a certain spontaneity that can be had by shooting as the whim strikes, but try to slow down before pushing the button.
Second, take stock of the light. You’ll notice in my images that the light plays a role in the image. Unless it’s overcast (and in which case, light comes in from every which way) you should look at how the shadows and highlights are enhancing or detracting from your image. Taking a portrait (selfie or otherwise) on Adams with Washington in the background is hard, because except for early and late in the day, the sun is pointed at your camera. Your shot will inevitably get washed out. So consider a different background, or perhaps turn your flash on. Yes, the flash works in the daytime, too.
Third, compose your shot. Try to tell a story. Compose the image so the viewer’s eye goes from the principal subject, to the secondary subject, to the background.
I also encourage you to do three things:
One: Don’t obsess over gear. Or do so, but only after consulting with your financial advisor. I’ve taken some of my best images with a $20 Holga camera. It has the most basic lens that’s made with no quality control whatsoever. The camera itself leaks light unless you cover it up with black tape. And it has no real controls other than its shutter. Chasing down the best photo gear can mean dropping thousands of dollars. But it’s still your finger pushing the shutter release, and if you’ve not mastered the basic art of composing the image, a thousand dollar camera is going to record your mistakes dispassionately.
Two: Take pictures. A lot of them. A dear friend recounted his first day in Freshman Drawing class when he was in art school. His professor told everyone “each of you has a stack of lousy drawings inside of you, and there’s only one way to get rid of them. So grab your pencils and we’re going to get started.” I had a professor tell me something similar when I was in art school. “By the time you’ve drawn it 8-12 times, your drawing should start looking like what’s in front of you.” So I’ll tell you that by about your ten thousandth mistake, you should probably be getting a good idea where you’re going wrong, and more crucially, where you’re actually doing pretty well. Keep the faith. You’ll get there.
Two-A: Don’t be modest about it, either. Just take pictures, and ignore the naysayers. They’re not taking photos, so what do they know, anyway?
Two-B: When I say “a lot of them”, consider this: I count on a ratio of one good shot to every 10-15 misses. If my average blog post has 8-10 pictures, that means I took more than 100 shots to get those few. Accept that you’re going to miss a lot. Some trips, I get home and struggle to find 3-5 images that are “good enough.” It happens. Sometimes the gods are in a mood. Sometimes they smile. Take the good with the bad.
Three: Study. Go to museums. Read books about photographers, photography, lighting, and the sort. Take a class. Then take another one. Put your schoolwork to action. Lather, rinse, repeat.
Lastly, relax. Have fun. Don’t let taking the shot get in the way of enjoying the trail. It’s why we’re out there in the first place, right? Right!
I’m very much not on Facebook, and this is by design. Some of you will have figured that out by now. But if you post to places like Twitter, Tumblr, or any of the big photo sharing sites, drop me a note when you’ve taken a photo that you’re particularly proud of. Who knows, if this gets any traction, I might make a “best of” section on this blog, to showcase everyone’s best work. Might be fun.
As always, stay safe out there.
If you enjoy reading these posts, please subscribe — stay in the loop! Your email will only be used to alert you of new posts — typically 1-2 times per week. I will not use or share your email for any other purpose without your express permission. And feel free to share via social media using the buttons below.
Find me in the mountains, on this blog, or on Twitter: @Protean_Hiker
If you’ve got questions, comments, or suggestions for future posts, drop me a note via the comment section in the side-bar.
